Thermal Imaging for Ice Dams: The Ultimate Guide to Detection and Prevention
It’s a familiar scene for Alaska homeowners during winter: beautiful icicles hanging from the roofline, glistening in the morning sun. But those picture-perfect icicles often signal something far less beautiful happening above your ceiling—an ice dam forming on your roof, ready to send water seeping into your walls, insulation, and living spaces.
Ice dams are responsible for some of the most expensive home insurance claims in cold climate regions, with the average claim exceeding $20,000. And here’s what most homeowners don’t realize: ice dams aren’t caused by snow, cold weather, or faulty roofing materials. They’re caused by heat loss from inside your home escaping into your attic.
This is where thermal imaging changes everything. Using infrared technology, certified professionals can now see exactly where heat is escaping from your home—revealing the invisible problems that lead to ice dam prevention issues. Better yet, once you know where heat is escaping, you can fix the root cause and eliminate ice dams permanently.
In this comprehensive guide, you’ll learn exactly how ice dams form, why thermal imaging is the gold standard for diagnosis, and how spray foam insulation provides a complete solution for ice dam prevention.
What Are Ice Dams and Why Should Alaska Homeowners Care?
Before we dive into solutions, let’s understand exactly what we’re dealing with and why Alaska homes are particularly vulnerable to ice dam damage.
How Ice Dams Form: The Science Behind Winter Roof Damage
Ice dams form through a surprisingly simple process that occurs when three conditions exist simultaneously:
- Snow accumulates on your roof — providing the water source
- Part of your roof surface warms above 32°F — typically the upper sections closest to heat sources
- The roof edge stays below 32°F — the eaves that extend beyond your exterior walls
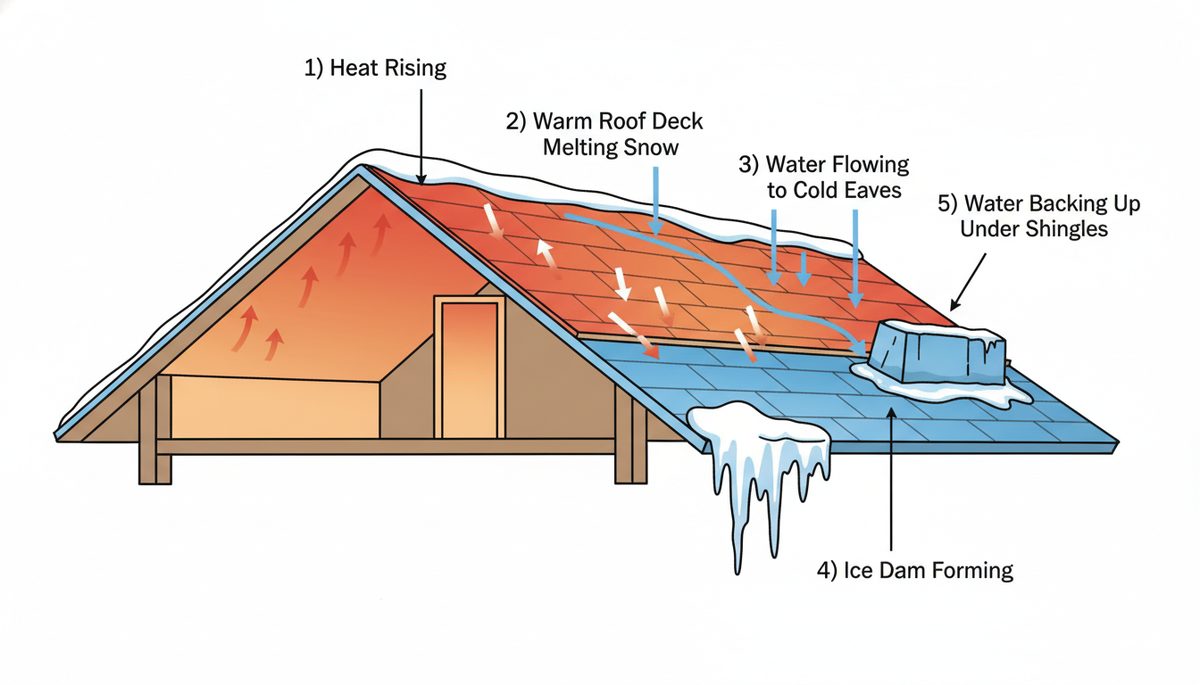
Here’s what happens: Heat escaping from your living space warms your attic. That warmth transfers through the roof deck, raising the temperature of your shingles in those areas. When the roof surface exceeds 32°F, snow melts. The meltwater flows down your roof toward the eaves—but the eaves remain cold because they extend beyond your home’s heated envelope.
When that flowing water reaches the cold eaves, it refreezes, forming a ridge of ice. As more water flows down and refreezes, the ice dam grows larger. Eventually, water backs up behind the dam, pooling on your roof. With nowhere else to go, this water works its way under shingles, through the roof deck, and into your home.
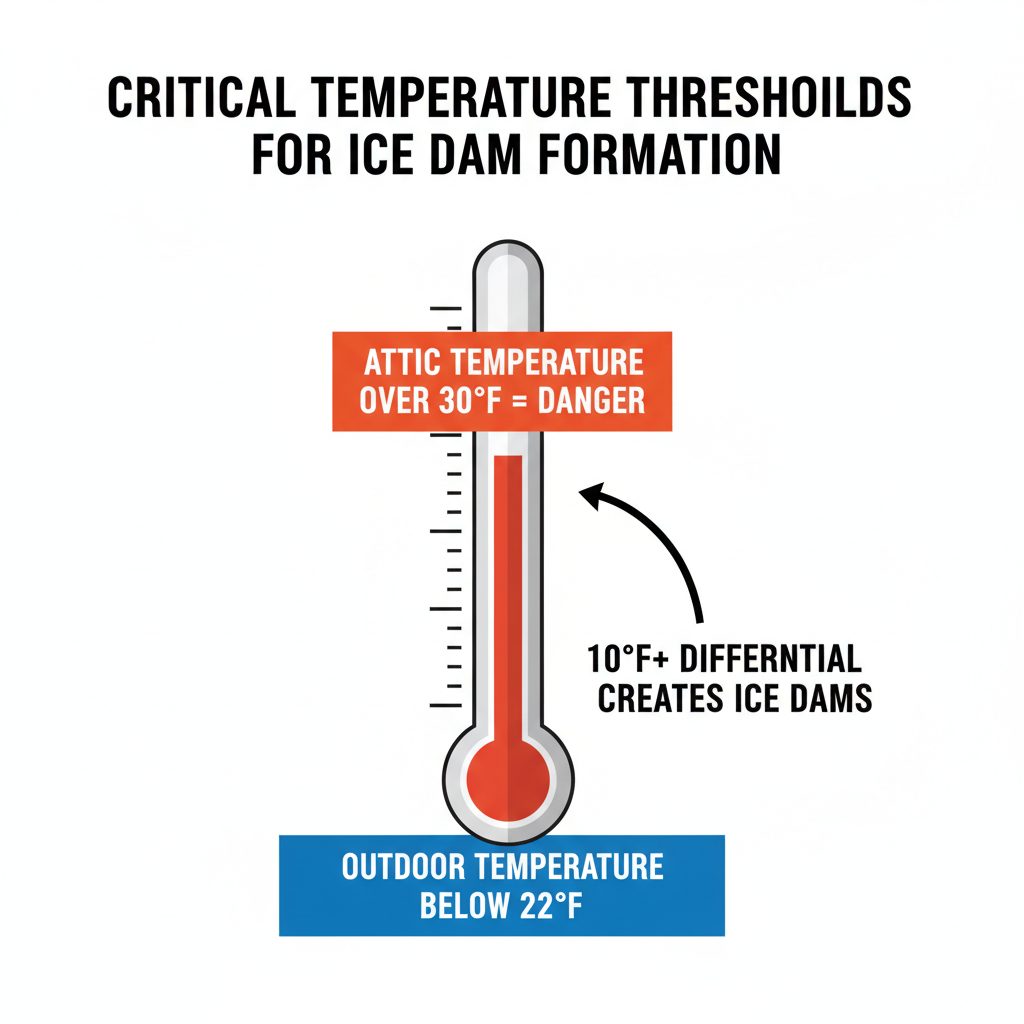
According to the University of Minnesota Extension, the critical temperature thresholds are an attic temperature above 30°F combined with outdoor temperatures below 22°F. That 8-10°F differential along your roof surface is what enables the thaw-freeze cycle that creates ice dams.
The Real Cost of Ice Dam Damage
The financial impact of ice dams extends far beyond a one-time repair:
Immediate Damage Costs
- Water-stained ceilings and walls: $500-$2,000 to repair
- Damaged insulation requiring replacement: $1,000-$4,000
- Mold remediation (if water damage goes unaddressed): $2,000-$10,000+
- Structural repairs to framing: $2,000-$8,000
- Torn gutters from ice weight: $500-$1,500
Perhaps most concerning is the health impact: moisture intrusion from ice dams creates ideal conditions for mold growth. The Minnesota Department of Commerce warns that mold and mildew from ice dam moisture can cause respiratory problems, particularly for those with allergies or asthma.
Why Alaska Is Especially Prone to Ice Dams
Alaska homeowners face a perfect storm of conditions that make ice dams particularly common:
Climate Factors:
- Extreme cold and heavy snowfall throughout Alaska’s long winters
- Frequent freeze-thaw cycles swing temperatures above and below freezing
- Extended cold spells maintain the temperature differentials that enable ice dam formation
- Climate zones 7 and 8 require R-49 to R-60 attic insulation per current building codes
Housing Stock Factors:
- Many Alaska homes were built before modern energy codes existed
- Older homes typically have R-19 to R-30 insulation (well below current requirements)
- Balloon-frame construction in older homes creates significant air leakage pathways
- Complex roof designs (dormers, valleys, varying slopes) create more opportunities for ice dam formation
The Primary Cause of Ice Dams: Heat Loss Through Your Attic
Here’s the critical insight that changes everything about ice dam prevention: ice dams are a symptom, not the disease. The disease is heat loss from your living space into your attic.
Air Leaks: The Hidden Culprit
According to ENERGY STAR, air leakage can account for 30-40% of total home heat loss. And the vast majority of heat that enters your attic does so through air leaks—not through insulation deficiencies.
Think about it: warm air rises (that’s the stack effect). Your home is essentially a chimney, with warm air constantly pushing upward, seeking any gap or crack to escape through. These gaps exist everywhere:
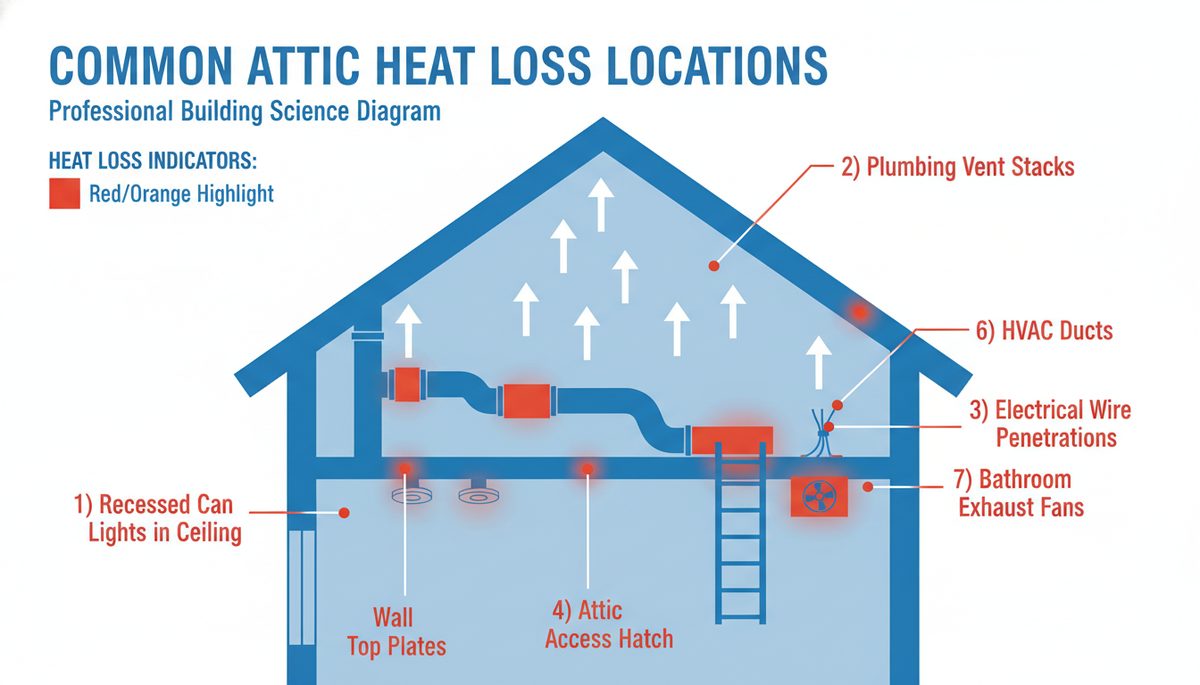
Common Air Leak Locations:
- Recessed can lights (notorious heat sources, often equivalent to leaving a window open)
- Plumbing vent stacks that penetrate the ceiling
- Electrical wiring and junction boxes
- HVAC ducts running through unconditioned attic space
- Attic access hatches with poor weatherstripping
- Top plates where interior walls meet the attic floor
- Chimney chases and furnace flues
- Bathroom and kitchen exhaust fans
The Building America Solution Center, a U.S. Department of Energy resource, states clearly: “The most important step is to seal all of the air leaks from the conditioned space into the attic space.”
Inadequate or Damaged Insulation
While air sealing comes first, insulation matters too. Insulation slows heat transfer through conduction—the movement of heat through solid materials like your ceiling, rafters, and roof deck.
| Home Age | Typical R-Value | Current Code Requirement |
|---|---|---|
| Pre-1970 | R-11 to R-19 | R-49 to R-60 |
| 1970-1990 | R-19 to R-30 | R-49 to R-60 |
| 1990-2010 | R-30 to R-38 | R-49 to R-60 |
| 2010+ | R-38 to R-49 | R-49 to R-60 |
Ventilation Issues
Proper attic ventilation serves an important role: exhausting any heat that does enter the attic before it can warm the roof deck. However, building science experts consistently emphasize that ventilation is the third priority—after air sealing and insulation.
Key Takeaway
Air sealing must come first, insulation second, ventilation third. This three-part approach is the only reliable way to prevent ice dams permanently.
How Thermal Imaging Detects Ice Dam Risk Factors
Now that you understand what causes ice dams, the question becomes: how do you find where heat is escaping from your home? The answer is thermal imaging—and it’s revolutionized how professionals diagnose ice dam problems.
What Is Thermal Imaging and How Does It Work?
Thermal imaging (also called infrared thermography) uses specialized cameras that detect infrared radiation—the heat energy emitted by all objects. Unlike regular cameras that capture visible light, thermal cameras create images based on temperature differences.
Here’s what you see in a thermal image:
- Hot spots (red, orange, yellow) — areas where heat is escaping or surfaces are warmer than surrounding areas
- Cold spots (blue, purple) — areas where cold air is infiltrating or surfaces are cooler
- Temperature gradients — transitions between warm and cool zones that reveal hidden problems
The Department of Energy recommends thermographic inspections as one of the most effective ways to identify air leaks and insulation deficiencies.
What Thermal Imaging Reveals About Your Home
In the context of ice dam prevention, thermal imaging reveals:
- Missing or Inadequate Insulation: Thin spots where insulation has settled or shifted, complete gaps where insulation was never installed
- Air Leakage Points: Warm air streaming around electrical outlets and switches, heat escaping through recessed light fixtures
- Thermal Bridging: Heat conducting through rafters visible as warm lines on exterior scans
- Moisture Intrusion: Damp areas showing as cold spots due to evaporative cooling
According to the University of Minnesota Extension, “Weatherization contractors are professionals who can deal with the heat transfer problem that creates ice dams. The contractor you hire should conduct a blower door test to evaluate how airtight your ceiling is. They also may use an infrared camera to find places in the ceiling where there is excessive heat loss.”
When Is the Best Time for Thermal Imaging?
Optimal Conditions:
- Temperature differential of 15-20°F or more (inside vs. outside)
- Winter months provide ideal conditions in Alaska
- Early morning before sunrise (eliminates solar heating interference)
- Late evening after sunset
- During cold spells when your heating system is actively running
Professional vs. DIY Thermal Imaging
While consumer thermal cameras have become more affordable ($150-$1,000), there’s a significant difference between DIY scanning and professional inspection:
Professional Advantages:
- Equipment: Professional cameras ($6,000-$24,000) have higher sensitivity and resolution
- Training: Certified thermographers understand what they’re seeing and why
- Interpretation: Experience distinguishes actual problems from normal variations
- Comprehensive approach: Professional inspections include air sealing recommendations
- Documentation: Detailed reports with images, analysis, and prioritized action plans
Common Heat Loss Problems Revealed by Thermal Imaging
Understanding the specific problems thermal imaging reveals helps you know what to look for and what to expect during a professional inspection. Here are the most common issues found in Alaska homes.
Attic Air Bypasses
Air bypasses are hidden pathways that allow warm air to flow directly from living spaces into the attic, completely circumventing insulation. Building Science Corporation identifies these as the primary source of attic heat:
- Top Plates: The gap between the top of interior walls and the attic floor is often unsealed
- Plumbing Stacks and Chases: Vertical chases for plumbing, electrical, and duct runs create direct pathways
- Chimney Chases: The space around chimneys requires fire-stopping but often has significant gaps
- Dropped Ceilings and Soffits: Kitchen soffits, bathroom exhaust fan housings create hidden cavities
- Knee Walls: In Cape Cod-style homes with finished attics, knee walls are notorious air leakage points
Problematic Penetrations
Specific fixtures and features create concentrated heat loss points:
- Recessed Can Lights: These are among the worst offenders. Non-IC-rated fixtures can’t have insulation placed against them, creating large uninsulated voids.
- Electrical Boxes: Outlet and switch boxes in ceilings below attic spaces allow warm air to bypass insulation.
- HVAC Equipment: Ductwork in unconditioned attic space leaks heat.
- Bathroom Exhaust Fans: Many exhaust fans are improperly vented into attic spaces rather than outside.
- Attic Access Hatches: The attic access door or pull-down stairs is often the single largest hole in your ceiling.
Spray Foam Insulation: The Complete Ice Dam Prevention Solution
Now that you understand the causes and how to identify them, let’s talk solutions. While there are multiple approaches to ice dam prevention, spray foam insulation offers unique advantages that make it the most comprehensive solution available.
Why Spray Foam Outperforms Traditional Insulation for Ice Dams
Traditional insulation materials like fiberglass batts and blown-in cellulose are thermal barriers—they slow heat transfer through conduction. But they do nothing to stop air leakage. In fact, air moves readily through fiberglass batts.
Spray foam is fundamentally different. When applied, it expands to fill cavities completely, creating both an air barrier and a thermal barrier simultaneously. This dual function is why This Old House recommends spray foam for ice dam prevention:
“Spray foam insulation installed in an unvented attic is a great choice. Closed-cell spray foam is moisture resistant and achieves R-38, which is ideal for preventing heat loss and ice dam formation.”
Key Spray Foam Advantages:
| Insulation Type | R-Value per Inch | Air Sealing? |
|---|---|---|
| Closed-cell spray foam | R-7 | Yes |
| Open-cell spray foam | R-3.6 | Yes |
| Fiberglass batts | R-3.2 | No |
| Blown-in cellulose | R-3.5 | No |
Unvented Attic: The Modern Approach
One of spray foam’s most powerful applications is creating an unvented (conditioned) attic. Rather than insulating the attic floor and ventilating the attic space, spray foam is applied directly to the underside of the roof deck.
How It Works:
- Closed-cell spray foam is sprayed onto the roof deck underside and gable ends
- This brings the attic inside the conditioned envelope of your home
- The attic temperature stays close to indoor temperature year-round
- No temperature differential between attic and living space means no heat transfer through ceiling
- No heat reaching the roof deck means no snow melting—and no ice dams
ROI of Spray Foam for Ice Dam Prevention
The investment in spray foam pays returns in multiple ways:
Eliminated Ice Dam Costs:
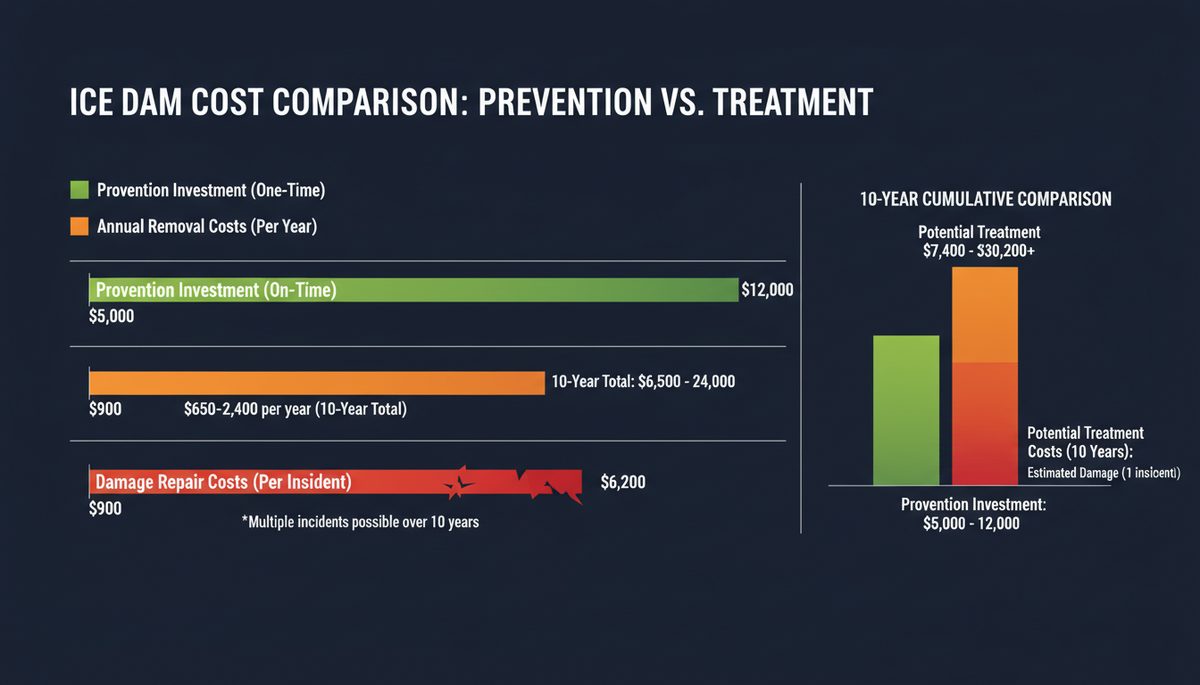
- No more annual removal: Save $650-$2,400 per year
- No more damage repairs: Avoid $900-$6,200 per incident
- No more insurance claims: Keep premiums low
Energy Savings: ENERGY STAR estimates properly insulated homes save 10-20% on heating and cooling. Air sealing alone can reduce energy use by 15-30%.
20-Year ROI Estimate
- Annual savings (energy + avoided ice dam costs): $1,500-$3,000
- 20-year savings: $30,000-$60,000
- Typical spray foam investment for attic: $5,000-$12,000
- ROI: 250-500%+
The Professional Ice Dam Prevention Process
Understanding what happens during professional ice dam prevention helps you know what to expect and ensures you receive comprehensive service. Here’s the process from initial assessment to final verification.

Step 1: Thermal Imaging Inspection
A thorough inspection begins with thermal imaging to map heat loss throughout your home. The inspection typically takes 1-2 hours for a standard single-family home.
Step 2: Assessment and Recommendations
Following the thermal imaging inspection, you’ll receive a detailed report with thermal images, priority ranking of problems, solution options, and cost estimates.
Step 3: Air Sealing
With problems identified, air sealing begins. All electrical, plumbing, and HVAC penetrations are sealed with appropriate materials.
Step 4: Insulation Installation
Once air sealing is complete, insulation is installed to achieve target R-values for your climate zone (R-49 to R-60 for Alaska).
Step 5: Verification and Documentation
Quality work includes post-installation thermal imaging to confirm heat loss has been eliminated, along with before/after comparison documentation.
What About Other Ice Dam Prevention Methods?
You may have heard about other approaches to ice dam prevention. Let’s examine them honestly to understand their roles and limitations.
Heat Cables (De-Icing Cables)
Heat cables are electric wires installed in a zigzag pattern along roof edges. However, they don’t prevent ice dams—they just move where the ice forms. The Minnesota Department of Commerce warns: “Do not use heating cables to eliminate or prevent ice dams. They are hard on your roof and will shorten its life span.”
Roof Raking
Roof rakes allow homeowners to pull snow off the roof edge from ground level. While this addresses the symptom (snow), it doesn’t address the cause (heat loss). It must be done after every significant snowfall and won’t work for multi-story homes.
Ventilation Improvements Alone
Some contractors recommend adding more attic ventilation. However, Fine Homebuilding warns: “Ventilation should always be the third step in fixing ice dams.” Adding ridge vents without air sealing can actually worsen problems by depressurizing the attic.
The Bottom Line
The only permanent solution to ice dams is addressing the root cause: heat entering your attic. Heat cables, roof raking, and ventilation-only approaches treat symptoms while the underlying problem persists.
Frequently Asked Questions About Thermal Imaging and Ice Dam Prevention
What causes ice dams on roofs?
Ice dams form when heat escaping from your home warms the attic and roof deck, melting snow on the upper portions of your roof. This meltwater flows down toward the eaves, which remain cold because they extend beyond your home’s heated envelope. When the water reaches these cold eaves, it refreezes, creating a dam of ice that causes water to back up under shingles and leak into your home.
How do you prevent ice dams?
Permanent ice dam prevention requires a three-part approach: 1) Air seal the attic to close all gaps that allow warm air to enter; 2) Add insulation to achieve R-49 to R-60; 3) Ensure proper ventilation from soffit to ridge. Spray foam insulation is particularly effective because it creates both the air barrier and thermal barrier simultaneously.
Does spray foam insulation prevent ice dams?
Yes, spray foam is highly effective for ice dam prevention. Closed-cell spray foam provides R-7 per inch of insulation value while simultaneously creating an air barrier that stops warm air from entering the attic. When applied to the roof deck (unvented attic approach), spray foam eliminates the temperature differential that causes ice dams.
Can thermal imaging detect insulation problems?
Absolutely. Thermal imaging cameras detect temperature variations that reveal insulation deficiencies. Missing insulation appears as hot spots where heat escapes, while areas with adequate insulation maintain consistent temperatures. Thermal imaging also reveals settling or compression in existing insulation, gaps around penetrations, and thermal bridging through framing members.
How much does thermal imaging inspection cost?
Professional thermal imaging inspections typically range from $200-$500 for a comprehensive assessment. This investment provides detailed documentation of heat loss locations and prioritized recommendations for fixes. Compared to the cost of ice dam damage ($900-$6,200 per incident) or annual removal ($650-$2,400), thermal imaging is a modest investment in preventive diagnosis.
How much does ice dam removal cost?
Professional ice dam removal typically costs $650-$2,400 per incident, depending on severity and method used. Steam removal (the safest method) runs $800-$2,400. These costs recur annually in homes that don’t address the underlying heat loss problem—making prevention far more economical than repeated removal.
Is insulation or ventilation more important for ice dam prevention?
Air sealing is actually most important, followed by insulation, with ventilation third. Air leakage is the primary way heat enters most attics. Adding insulation without air sealing often provides limited benefit because warm air still bypasses the insulation through gaps and cracks. For optimal results, all three work together.
What temperature causes ice dams to form?
Ice dams form when the attic temperature exceeds 30°F while outdoor temperatures remain below 22°F. This creates a temperature differential along the roof surface, with the area over the attic rising above freezing while the eaves stay below freezing. The 8-10°F difference enables the thaw-freeze cycle that creates ice dams.
When is the best time for thermal imaging?
Winter is optimal because the temperature difference between indoors and outdoors is greatest. The inspection requires at least 15-20°F difference between interior and exterior temperatures. The best times are early morning before sunrise or late evening after sunset, avoiding solar heating interference. Alaska winters provide excellent conditions from November through March.
Is ice dam prevention worth the cost?
Yes—the math strongly favors prevention. Annual ice dam removal costs $650-$2,400, damage repairs cost $900-$6,200 per incident, and energy waste adds 15-30% to heating bills. A one-time investment in proper air sealing and insulation ($3,000-$12,000) eliminates these recurring costs. Most homeowners recoup their investment within 3-5 years through combined energy savings and avoided damage costs.
Take Action: Stop Ice Dams Before They Start
Ice dams don't have to be an inevitable part of Alaska winters. With the right approach, you can eliminate them permanently while reducing energy costs and improving your home's comfort. Schedule a thermal imaging inspection to understand exactly what's happening in your attic and develop a targeted plan for permanent ice dam prevention.
This article was created to help Alaska homeowners understand and prevent ice dams through proper insulation and air sealing. For personalized recommendations based on your home’s specific conditions, contact our team for a professional thermal imaging assessment.
Related Services: Spray Foam Insulation | Crawl Space Insulation | Thermal Inspections | Ice Dam Prevention